One would imagine that the purpose of the Recycle Bin in Windows is to ultimately get rid of files and folders. After deleting a file or folder, by default the data goes to the Recycle Bin and stays there until such time as the Bin is emptied. This feature of Windows serves as a holding cell for things to be thrown away.
However, there are instances when you accidentally empty the Recycle Bin when it contained things you wanted to keep. Perhaps you inadvertently used the Shift and Delete keys combination to remove a group of files, only to remember that one of those files was of some importance.
There is also the chance that your teenage son or daughter wanted to make space for their ever growing MP3 collection and chose data at random to accomplish their goal.
There are many other occurrences where files are deleted, not in the Recycle Bin, and need to be retrieved. We realize that things went missing. But now we have the need to get them back. Locating data recovery software is much easier for the averagecomputer user than it used to be.
Truth be told, the
Recover My Files software (
http://www.recovermyfiles.com/) is a little on the pricey side. At $70, the price tag may have people looking at other less expensive, or freeware type solutions.
Consider the alternatives though. A data recovery service may cost you hundreds to thousands of dollars, depending on the amount of files you need to get back. Some, not all, of the “free” solutions may be difficult to use and produce inconsistent results.
While there is doubtfully any perfect file recovery software, one of the biggest draws to Recover My Files is its purported ease of use. Let’s dig through recovering some files to see how easy this process really is. We will begin by assuming that the software has been downloaded and installed.
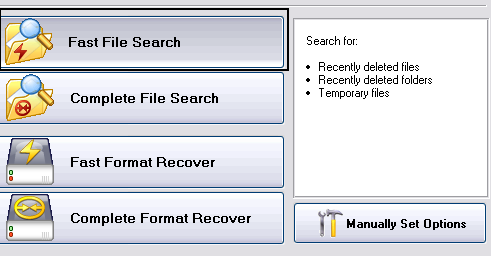
When you first run this software, you are automatically greeting with a wizard type interface to help you get started. You are presented with four choices. For this example, we are simply retrieving deleted files. Make note that you also have the option of recovering files from a hard drive that has been formatted.
Each selection in the above screen shot will have a description on the right hand side of the window giving you details as to what files the chosen action looks for, and if it will take a longer amount of time to do so. The selections which include the word “Complete” will take much longer than the selections with the word “Fast”. That said, the “Fast” options are less detailed. Ok, now we need to tell Recover My Files where to look.
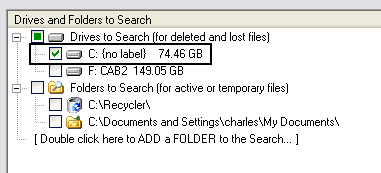
Unless you have done something to your Windows installation, you will most likely have a C: drive. Odds are, this is where you deleted something from. Of course, Recover My Files files will make note of other drives and include them in this list. But here we know that we deleted something from the C: drive. Now we need to pick the files types, if you want to.
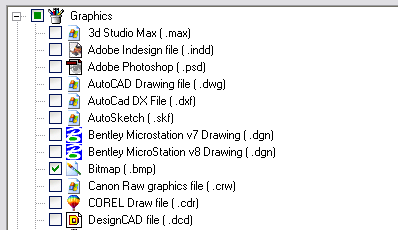
The next screen may be a little confusing for some, because not everyone may know all the file types they are looking for. This is not a problem though, you can pick as many, or as few, as you desire. The file type icons are present to the left of each file type, and this will aid in recognizing ones that you use. File types like BMP, JPG, DOC, and ZIP are pretty common, and are already selected. When you are ready, click on the Start button at the bottom of this screen.
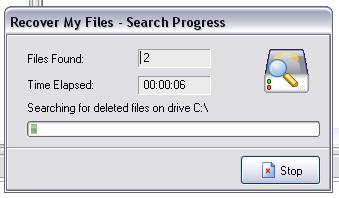
Now you can sit back and wait while Recover My Files performs the search. While the time counter is ticking up, you will also notice that the “Found Files” will increase as well. If for some reason, you wanted to halt the file search, there is a Stop button at your disposal.
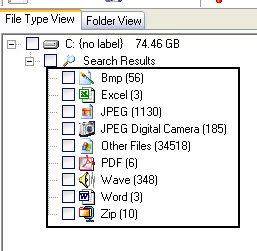
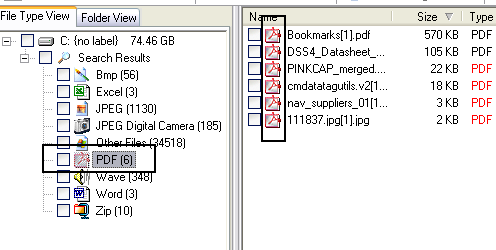
The search is done, and now the results screen is in view. On the left-hand side of this window, you will see a list of file types, and the number of files for each type that was found. On the right hand side of the screen, you will initially see a list of all of the deleted files. Instead of looking over the entire list of what was missing, you may click on one file type, on the left side, to narrow the view on your right.
Something to keep in mind during this process is file integrity. Thankfully, Recover My Files tags each recoverable file with a rating. If it labels a file as Very Good, then you should have no problem retrieving it. Should it tag a file as Poor, there is a possibility that the file may not come back in the same condition, or at all.
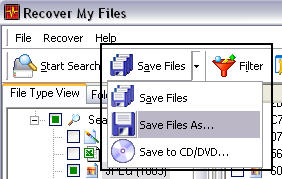
You can now select the files you wish to recover by using the check boxes on the left, to recover all the files of a particular type; or you may check off the individual files on the right hand side. Once you have your selection completed, click on Save Files, to save in a defaulted location (Save Files), a location of your choosing (Save Files As), or save them to a CD or DVD.
Though this process may seem a little long at first, actually walking through it does not take nearly as much time as one may think. There are several other options, such as the ability to select deleted files by a specific time period. For a quick path to “undelete” data though, Recovery My Files does a good job of taking the stress out of this type of operation.

0 comments:
Post a Comment