>
Showing posts with label Video Converter. Show all posts

How to convert Powerpoint to DVD video, Flash and PDF


I’ve been asked how to convert a Powerpoint to DVD, Flash, and PDF so many times by my co-workers that I am finally going to just write a tutorial on how to do it! Powerpoint presentations are great, but they are a lot more useful sometimes when you don’t have to use Powerpoint at all!
Converting a Powerpoint presentation to DVD is great because it is much easier to distribute to others. Also it’s playable on any DVD player in the world, whether it be a laptop, desktop, stand-alone DVD player. Converting Powerpoint to PDF is good for those who want to send the presentation slides electronically, but don’t want people to be able to edit or modify the slides. Finally, converting Powerpoint to Flash is useful for those who want to embed the presentation on a web site.
Converting a Powerpoint presentation to video is also a nice because you can then upload those videos to YouTube or MySpace for sharing. Converting to MP4 format will allow you to enjoy Powerpoint presentations on your iPod or other mobile device! So let’s get into it.

Convert PowerPoint to DVD for Free

If you’re looking for a free way to convert Powerpoint to DVD, you have two options. The first method involves uploading to a Powerpoint hosting site that automatically converts your presentation into MP4 format, which you can then download and burn to DVD using free DVD burning software. The other way involves recording your screen into video format while playing a Powerpoint presentation and then burning it to DVD.
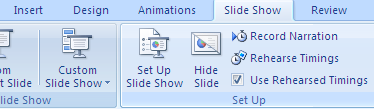
The first method involves taking a completed presentation and uploading it to a site called AuthorStream. You have to sign up to use the service, but it’s free and definitely worth it. It’s not as popular as Slideshare, but it’s still good. AuthorStream will also keep any audio recordings that you may have in the presentation. You can record audio by going to the Slide Show tab and clicking on Record Narration.

record audio
Once you have it uploaded, you will see links to download the file as a video in MP4 format. Along with that, you can directly upload the Powerpoint video to YouTubeor download a video podcast version of your presentation into iTunes so that it can be synced to your iPod!

authorstream
Image Source: DigitalInspiration
This is a very simple and easy way to get your presentation into a video format. The second method involves using a free screen recording program to capture the entire presentation in AVI video format. After that, you can use another program to convert the AVI to a DVD ISO image and then burn the image to DVD.
Firstly, check out this tutorial on how to use Camtasia to record the Powerpoint presentation to AVI format. Don’t worry about Step 2 or Step 3 because that software is no longer available.
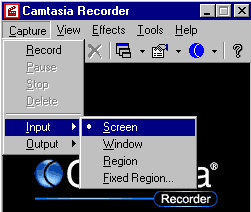
camtasia
Once you have captured your presentation and saved it to AVI format, you canAvi2DVD to convert it and then use DVD Decrypter to burn the final DVD!
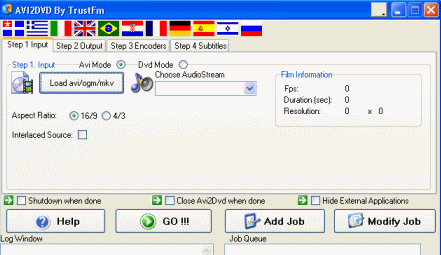
avi2dvd
AfterDawn has an excellent tutorial on the exact steps you need to take to convert your AVI to DVD and then burn it.

Convert Powerpoint to Flash

If the conversion steps for DVD seemed a bit much, you’ll be happy about converting to Flash. Most of the time people convert to Flash so that they can embed their presentations into a web page. Luckily, there are already many sites that convert Powerpoint presentations to Flash and even give you the embed code, so you don’t have to host the presentation off your servers.
You can check out SlideshareSplashCastAuthorStreamScribdZoho Show, and SlideAware for getting flash versions of your Powerpoint presentation. Digital Inspiration wrote up a post with all of the Powerpoint media players from each of the above sites. See which one you like the best and then use it to create your own Powerpoint media player. You can then embed it into your blog or web site.
If you want to convert the Powerpoint presentation to Flash and have it saved on your local computer, you need to use a desktop application instead of the web sites above.
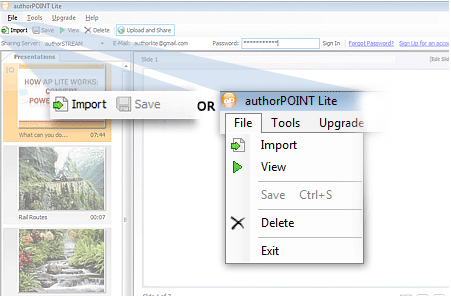
authorPoint Lite is a free desktop software that provides fast, accurate and high quality conversions of PowerPoint (.ppt, .pps, .pptx and .ppsx) to Flash (.swf). Once converted, your Flash presentation has the same impact as your PowerPoint presentation retaining its effects, sound, animation, and rehearsed timings etc; plus you have all the benefits of a Flash file like reduced size, secure content, and easy distribution on the Web.

authorpointlite

Convert Powerpoint to PDF

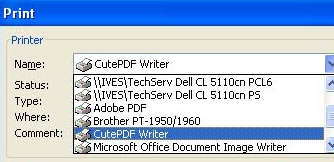
The only way I could figure out to convert a Powerpoint presentation into PDF for free was to use CutePDF Writer software and print out all of the slides. CutePDF Writer allows you to create PDFs for anything that you can print.
You’ll notice two links on the left side, one for free download and one for free converter, you need to download both and install them. Now go to PowerPoint, open your presentation, choose Print, and choose CutePDF Writer from the drop down menu.

cutepdf write
That’s it! Hopefully, using the guides above you have been able to convert your Powerpoint presentation into the desired format! If not, post a comment and we’ll try to help you convert it! Enjoy!
You can also read up on other conversion posts, such as how to convert PDF to Word.

rip and convert DVD movies to almost all video and audio formats with high DVD ripping speed and great quality


Whether we want to rip a whole 4.5GB DVD or 20 second video clips taken from cellphones, ImTOO’s software provides a combo of conversion options so you can easily convert your movies or videos to almost any popular media format.
It’s easy to use interface also lets you perform more advanced tasks like down mixing a 5.1 source to a 2 channel stereo output.
Below are the steps to rip an entire DVD using ImTOO:
1. locate the DVD folder using the DVD button
2. Choose an output format from the “profile” choices. Choose MP4 if you want to convert for MP4 devices like PSP and iPod, choose AVI on the other hand if you want to convert for AVI capable devices like Archos.
3. Choose the audio source. Usually you will choose the audio track that contains the regular dubbing of the movie. The other options available on the DVD could be an audio track of other languages or the audio comments from the movieproducers.
clip_image002
4. Set the output movie’s video size,, audio bit rate and codec. Usually I set this to automatic but you can choose to resize to a smaller video size if you only need to play it on small screens. I prefer not to go down the 128 bit rate and 48000 sample rate values since lower settings would mean a lower sound quality than a common MP3 file.
5. Click the red button to begin ripping
Usually the length of the movie is the about the same amount of time to rip a movie. For example, if your movie 1.5 hours long, you will wait up to 1.5 hours to rip the entire film. I learned this a decade ago when I was ripping VCDs, I think it is still true for DVDs as I have experienced with ImTOO and other ripping tools like Nero Recode.


How to Convert videos into iPhone format


So I’ve been using my iPhone a lot these days and one thing that is a must for me is to sync up all my movies, TV shows, and videos onto my phone so that I can watch them on the go, rather than streaming the videos to my xBox.
Though it’s great for watching stuff at home on my TV, it sucks that I cannot carry around my movies wherever I go! But alas, there are many tools out there that let you convert your videos into the proper iPhone format.
HandBrake is a free and very nice tool to convert most video formats, including AVI, MKV and more into the required MP4 or M4V formats that the iPhone supports.
convert video to iphone format
So how do you use this program? For newbies, it can look a bit intimidating, but it’s really pretty straightforward once you do it a few times.
First, open the program and click the Source button at the top left and then chooseVideo File or DVD/Video_TS Folder if you want to convert an already ripped DVD into the iPhone format.
handbrake iphone
Select the video file and the path will populate into the Source text box. Now you need to click on the Browse button next in the Destination section. Choose your output path and type a name for the converted file, then click Save. Don’t worry about the file type at this point.
convert video to mp4
By default, the preset is set to Basic. Now click on the iPhone & iPod Touch preset in the right hand column. Once you do this, the file extension will change to m4v.
add video to iphone
At the bottom, you’ll see a bunch of tabs where you can further customize the settings for the output video. For me, I’ve never had to change anything there, but if you want to, you can.
video settings
Now to convert your video, just click on the Add to Queue button and a new window will pop up with the summary in a list format. If you have a bunch of videos to convert at once, just go back to the main screen and repeat all the steps again like choosing Source, etc.
Click Add to Queue again and the second video will be added to the queue list and so on. Just remember to change the name of the output file since that does not happen automatically!
encode iphone format
Finally, click on the green arrow Encode button and that’s it! A few commandwindows will pop up and all that, but after a little while, your newly converted video will be ready to sync onto your iPhone! Depending on the size, it can take anywhere from 20 minutes to several hours to convert a video. Enjoy!

How to Convert DVD to iPod, MPEG, MP4, PSP, 3GP, and AVI for free


Would you like to be able to watch a DVD on your iPod, PSP or mobile phonewithout doing anything very technical and for free? Movie2X DVD Ripper is a simple to use DVD conversion program that allows you to convert a regular or protected DVD into the most popular video formats, such as AVI, MP4, PSP and more. It also lets you convert between formats, i.e. AVI to MP4, MOV to MPG, etc.
The software supports the iPod, PSP, Mobile Phone, Archos, Microsoft Zune, and Creative Zen formats. The interface is easy for beginners, but has lots of options and preferences for advanced users also, such as the bit rate, frame rate, sample rate, etc. It also supports other formats such as xVid, DIVx, and H263 (high-definition).
I really like this program because it supports some of the more advanced features of DVD’s, such as the higher quality audio codecs, subtitles, and different angles. It also includes a DVD/Video player to preview files. You can also change the video aspect, so if the DVD is wide screen, but you’re going to watch it on your iPod, you can convert the DVD into the regular 4:3 aspect ratio. Also, converting a full DVD might be become too large for your mobile device, so you have two options, either convert only a portion of the film or split the outputted file into multiple files.
You can also take out the audio and video separately since the streams are processed individually. There are also other cool features like the ability to offset the subtitles or change the color of the subtitles.
Once you’ve installed the software, simply pop in your DVD, and either go to File and choose Add DVD, or click on the DVD button underneath the white text box.


The program will read the DVD and display the title and chapter information. You can choose which titles you want to convert. This is good because you can uncheck all of the really short chapters, which are probably previews or interviews, etc.

Next, you want to choose the “Profile” or what you want the DVD to be converted into. You can also choose the zoom options: Keep Aspect, Medium, Letterbox, and Pan and Scan. Type in a name for your file and if you want to split the files, you can choose from 650 MB, 700 MB, 800 MB CD, 4.7 GB DVD, or a custom size.

Choose the output folder and click Convert! The amount of time it takes to convert will depend on what files type you are converting to and the speed of your computer’s processor. Make sure you have enough free space on the destination drive before converting.

How to Convert AVI, MPEG, WMV video to Flash (FLV, SWF)


Pazera Free Video to Flash Converter is an absolutely free application that converts the most popular audio & video files (AVIMPEGMP4, 3GP, MOV, MP3, WAV, WMA and other) into Flash Video format (FLV, SWF). Video files created by this program can be posted on video services such as YouTubeGoogle VideoMetacafeDailymotion and other.


convert any video file including AVI, MP4 3GP, MOV, WMA, etc to Flash video format, either SWF or FLV. This is pretty handy when you need to convert a large video file into a much smaller Flash video so that you can post it on a web site or onto a online video sharing site like YouTube.
Even though you can upload a 1GB file to YouTube, it’ll take forever over a DSL connection and it’s pretty slow over Cable too! That’s why I always convert my videos to Flash first, then upload. Of course, if you have a website, it’s always better to use Flash format if you can.
Pazera Free Video to Flash Converter is a standalone program, meaning there is no need to install anything on your computer, you simply run the EXE file.
convert video to flash[5]
Here are some of the major features of Pazera that I really like:
  • Completely portable…uses no registry keys or system files, which means you can throw it on a USB drive and run the program on any computer
  • Has a set of predefined profiles for converting videos to Flash. What’s great about this is that it has several profiles for converting videos into an acceptable YouTube format. It also has profiles for converting to FLV without audio or into small or large size. To get to the profiles, just click on Encoder and click on Load Encoder Settings.
convert avi to flash
  • You can also convert audio into FLV or SWF format by using an image or text as a background to the video
  • 2-pass encoding which will improve the quality of video, especially for grainy or dark videos
  • Supports a bunch of video formats including AVIDivXXviDMPEG, MPG, WMV, MOV, QT, FLV, SWF, MP43GP, VOB, VCD DAT, and OGM.
  • Supports the latest version of the LAME encoder and FFmpeg encoder.
The program is super simple to use, which is great for me! Just click Add files, select all your videos and pick which format you want to convert the video to: FLV or SWF. If you want to change the audio settings, video resolution, or crop the video, you can do that also at the bottom.
convert video to swf
Once you’ve added your videos, just click the Convert button at the top and all the videos will be converted to Flash. That’s it! Can’t get any simpler than that. You can also just drag and drop videos onto the GUI interface.
convert video to flv
So definitely check out Pazera Video to Flash Converter for all of your video to flash converting needs!